Paper Mario Modding
This book is a collection of tutorials and documentation for modding Paper Mario.
Contributing
If you want to contribute to this book, you can do so by making a pull request to the GitHub repository
If you have any questions, feel free to ask in the Star Haven Discord.
Paper Mario DX
Paper Mario DX is a modified version of the vanilla engine which provides a flexible, easy-to-use base for creating romhacks.
Read the Paper Mario DX manual
Introduction to Star Rod Classic
Star Rod Classic is a collection of modding tools for Paper Mario 64 (US version 1.0). These tools allow modders to make sweeping changes to the game, from tweaking and rebalancing existing content to adding multiple chapters worth of new content. Paired with a basic text editor, you will be able to add or edit maps, battles, enemies, badges, items, strings, and more. The tools contain a map editor, sprite/animation editor, image editor, and compiler.
Star Rod Classic is legacy software and will only recieve minor updates. Consider using Paper Mario DX instead, as it receives regular updates and is a more powerful tool.
Recommended Software
Text editor
Star Rod Classic effectively dumps many game assets to text files, which you may edit and compile back into a playable ROM. For this reason, a large part of modding Paper Mario will involve editing text files. Context-sensitive color coding and highlighting help reading these files and prevent basic syntax errors.
We recommend using either Notepad++ or Visual Studio Code. Notepad++ user-defined language files are provided with Star Rod for script files and string files. For VSCode, install the Star Rod extension.
Image editor
Sprites and textures can be edited in your favorite image editor and converted to the proper format using Star Rod's image editor. Bear in mind that all sprites and most textures use a color-indexed image format with strict limits for the number of colors per image (16 for sprites, 16 or 256 for textures). Many artists prefer using aseprite or libresprite for creating pixel art which can be exported as a color-indexed PNG or imported directly into Star Rod's sprite editor.
BGM editor
Mamar lets you create and edit BGM files from MIDI files.
Setting up Star Rod Classic and your modding folder
Requirements
- Java Development Kit (JDK) version 12 or newer (JDK version 17 or 20 recommended) (OpenJDK works as well) (a "standard" installation of Java, like JRE, does not suffice!)
- Star Rod modding tool (current version: 0.5.3) -> Download here: https://drive.google.com/file/d/1OUHnb9T7m_aVm-WJY3mmEgFS_DU0F2je/
- A valid Paper Mario US v1.0 ROM (There are a variety of tools you can use to dump a backup from your own cartridge. Please ensure your cartridge matches the required version.)
- MD5-Checksum (.z64):
a722f8161ff489943191330bf8416496 - If you do have a clean NTSC-U ROM, but it is in the .n64 or .v64 format, use the following website to fix your ROM: https://hack64.net/tools/swapper.php
- MD5-Checksum (.z64):
Installation
- Check if you already have an up-to-date version of JDK installed.
- If you know your way around a terminal, open one up and enter
java --version. - To check using Windows menues: TODO
- If you know your way around a terminal, open one up and enter
- If you do not have JDK version 12 or newer installed, get it here: https://www.oracle.com/java/technologies/downloads/
- Download the current version of Star Rod (see: Requirements), then extract the .zip file somewhere you can easily find it again. It's recommended to set up a folder for your modding and have the folder for Star Rod inside of that.
Preparing your mod folder
- If you're on Windows, launch
StarRod.exe. MacOS and Linux users launchStarRod.jarinstead (you may need to set the file to allow execution first). - When asked to create a new Star Rod config, choose Yes.
- When asked to pick a directory for your mod, choose the folder you set up during step 3) of the Installation.
- When asked to create a new mod config, choose Yes.
- You'll now be prompted to pick a clean NTSC-U (that is the North American release) ROM of Paper Mario. Commonly the correct ROM file is in the .z64 format.
- Once Star Rod has verified that your ROM is the correct one, Star Rod's Mod Manager will open
- Select
Dump ROM Assets. This will extract the game's data into a new folder calleddumpnext to your ROM file. This may take a few minutes, but only needs to be done once. - Select
Copy Assets to Modto copy the relevant data of the game's dump to your mod directory. - You can close Star Rod for now.
Now you're ready to start modding!
How to Create Your Mod
Star Rod Classic Tools
The next time you launch Star Rod Classic, you'll be prompted to open the Map Editor, Sprite Editor, Mod Manager and several other tools.
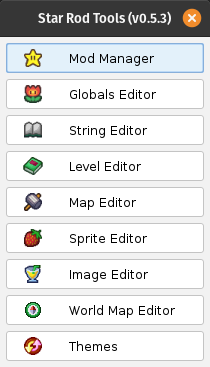
Use the Mod Manager to compile and package your mod. This is required to turn the directories of files in you modding directory into a new ROM.
Use the Globals Editor to edit items, badges, images and more. To edit the scripting of items or badges you'll need to actually write scripts yourself though, this menu cannot be used for that.
Use the String Editor to preview, add, delete or edit ingame text.
Use the Level Editor to modify the way maps and battle maps are organized.
Use the Map Editor to view, create and modify the ingame maps.
Use the Sprite Editor to adjust sprites of characters and items, as well as view, create and edit animation loops.
Use the World Map Editor to change the world map displayed in the pause menu.
Use the Themes menu to change the look of Star Rod itself.
For changing the scripting of maps, battles, badges and more, please see: TODO link to yet non-existing guide TODO link the bold editor mentions above to respective tutorials
Note: Some of Star Rod's graphical editors, like the Map Editor or Sprite Editor, do require OpenGL to run. While OpenGL should be installed by any general graphics card driver installation, or come pre-installed on most operating systems, these editors are known to cause issues or not load at all on some MacOS or Linux setups. If you use MacOS or Linux, then some of Star Rod's editors may not load at all, instead freezing the program. Sadly, there is no known work-around at the moment. Using Windows however causes no known problems with OpenGL.
Debug Features
When compiling your mod in the Mod Manager, set the Enable Debug Information option in the Compile Mod options > Debug menu to display map names and battle IDs at the bottom of the screen. The player's current position will also be printed.
This also enables the debug features, which can be accessed using the D-Pad buttons:
- Dpad-Up toggles turbo speed and makes enemies unable to start combat with Mario on contact.
- Dpad-Right opens the debug variable output and memory usage.
- Dpad-Down toggles God Mode, which makes Mario invulnerable to most damage, and makes every attack by Mario or partner deal 99 damage per hit.
- Dpad-Left toggles the debug menu, which can then be navigated using the Dpad, using R to enter menus / confirm choices, and L to cancel out of a menu. This menu allows for map warps, giving items and badges, unlocking partners and more.
How to Publish Your Mod
When you're satisfied with your romhack and it compiles successfully, click Package Modin the Mod Manager to create a binary diff file, also known as patch file (YourModName.mod). The player will need your .mod file (provided by you) and a clean copy of Paper Mario's NTSC-U ROM (provided by them).
Do not distribute patched ROMs!
The name of the resulting ROM will be identical to the name of your .mod file.
However, it is recommended to use external tools to create patch files for your mod, like Floating IPS (or FLIPS) (https://github.com/Alcaro/Flips). Creating a patch file using such a tool will likely create a smaller patch file (like a .bps file) than using Star Rod to package your mod would, while being faster at creating the patch file as well.
The Mod Directory Explained
The mod directory created and populated by Star Rod contains several folders you'll need for creating your romhack.
For some of the files in here you can use the editors provided by Star Rod mentioned above. Scripts, which control how maps and battles behave, have no editor associated with them and have to be edited by hand.
Those scripts are modified using patch files, and not by editing the source files of maps and battles directly. The files in the src directories are for quick reference only, instead create patch files in the respective patch directories. xml files and images are edited in-place however, instead of writing patch files for them.
The directories within the mod directory are the following:
/map/src/        Source files of maps scripts and editor map files
                 (copied from dump). For reference only, do not edit.
/map/patch/      Patch files for editing scripts or creating new ones.
/map/import/     Patch files here can be included in map scripts with
                 #import.
/map/save/       Save map files from the editor here to reference them
                 in scripts.
/map/build/      Binary map and collision data built from the editor.
/map/temp/       Patched map scripts are placed here during the patching
                 process. Just ignore this directory.

/world/          Scripting for the overworld behavior of partners.

/battle/formation/  Scripting of enemies in battle.
/battle/item/       Scripting of using items in battle.
/battle/move/       Scripting of Mario's attacks.
/battle/partner/    Scripting of partner attacks.
/battle/starpower/  Scripting of StarPower moves.

/image/texture/  General textures
/image/bg/       Map-Background images
/image/misc/     Edit title and pause screen images here.
/image/icon/*/   Icon images in color-indexed PNG format.

/sprite/         Player and NPC sprites.

/strings/        Edited strings and customs strings are added here.

/globals/        Various global data tables are built from files
                 here.
/globals/patch/  Global patch files are placed here.

/out/            Compiled and packaged mods will be placed here.

/mod.cfg         Star Rod's configuration file for handling the mod.
                 It's not required to manually edit this file, use
                 Star Rod instead.
Star Rod Mod Manager

Overview
Within the Mod Manager menu you are able to configure Star Rod itself, dump data from a clean Paper Mario ROM into a folder structure with human-readable files, compile your modded files back into a ROM, and package the modded ROM into a patch file for distributing your mod.
Mod Folder: Path to the directory you want to use to store your files while modding.Target ROM: Path to a clean Paper Mario US v1.0 ROM. Dumped data from the ROM will also be stored here.
Dumping
Dump ROM Assets: Extract data from the game ROM into a folder structure. Assets dumped include scripting for maps and battles, images like sprites and textures, and text used in dialogue boxes and item descriptions. Also converts these files into more readable formats, like script files into human-readable code, and image files into file types openable by most modern image editor software. This only needs to be done once.Options: Modify Star Rod's settings for the dumping process. For the most part you won't ever need to touch this menu. One of the options in here allows you to choose between tabstop and space indentation within dumped script files, should you prefer one or the other.Copy Assets to Mod: Copy relevant and previously dumped assets from the dump folder to your mod. This is required to be able to compile the ROM.
Building
Compile Mod: Attempts to compile the original sources copied to your mod folder together with your modded changes into a new ROM. If this step succeeds, then you can find the resulting ROM within theoutsubfolder within your Mod Folder. If Star Rod is unable to compile your mod for whatever reason, an error message will be shown which tries to explain the problem.Options: Modify Star Rod's settings for the building process. Some interesting options in here include:PropertiesMod Name: Your mod's title, displayed in the bottom left corner of the Save File Select screen.Initial Map: The map to start a newly created save file on.
OptionsSkip Intro Logos: Skips the intro logos when starting the ROM and instead loads into the intro story immediately.Disable Intro Story: Skips the intro story and instead loads into the title screen immediately.Disable Demo Reel: Removes the demo reel which usually play automatically when waiting on the title screen for a while.
DebugEnable Debug Information: Shows some debug information during gameplay at the bottom of the screen: Mario's current coordinates, and the currently loaded overworld or battle map. Also enables the debug menu, which can be activated by pressing Dpad-Left.Enable Variable Logging: Whenever a global variable changes, displays the name and new value of that variable on screen for a few seconds.
Package Mod: Create a patch file in the.modformat from the differences between the original Paper Mario US v1.0 ROM and your compiled mod within theoutfolder. This patch file can then be distributed to others without sharing the ROM directly. Using this feature not only takes longer than using other software for creating ROM patch files, but also results in patch files that are way bigger. It is recommended to use other software to create your patch files, like Floating IPS for bps patches, or Xdelta for xdelta patches.
Star Rod String Editor

Overview
Within the String Editor you can view and modify existing ingame text and create entirely new text to display. Text in Paper Mario uses a special string format which Star Rod translates into a custom markup language.
In the center on the left you can edit the current string.
In the bottom left you can add special characters and formatting.
In the top left a preview of how the current string will behave ingame is displayed.
On the right three tabs show different sub-menues: Resources, Strings and Variables.
Resources tab
The Resources tab scans your mod folder for references to ingame text and lists all occurrences it can find.
The src directory lists all strings of the original Paper Mario, ordered within several sub-groups. This directory is for reference only and strings in here should not be modified.
The patch directory lists all strings you added or changed using string patch files. This is the place changed or added strings are usually put in.
The Map Patches directory lists all strings declared directly within map patch files.
The Battle Patches directory lists all strings declared directly within battle patch files.
The Global Patches directory lists all strings declared directly within global patch files.
As implied above, it is possible to declare strings directly within patch files for maps, battles, or globals. Whether you want to have a string saved in the same file it is used in, or saved in a separate string patch file, is up to you.
You can select a sub-category by left-clicking on it. This will filter all the strings listed in the Strings tab to only show those of your selection.
Strings tab

The Strings tab shows all strings in your currently selected sub-category from the Resourcestab.
You can select a string by left-clicking on it.
Non-printing characters are represented by tags enclosed by square brackets with colon-separated parameters. Tags are used for special characters, such as symbols and button icons like [C-LEFT]; pauses or delays in printing like [PAUSE]; and more complex formatting functions which modify text size/color/etc. Each string has a unique identifier which includes a 16-bit section ID and a 16-bit message ID. For example, string 001C0002 is message 2 in section 1C.
You can click into a block of the currently shown string to have the string preview above display that block, including any formatting you have chosen. The currently previewed block gets colored blue to show that it is currently selected.
Variables tab

The Variables tab lets you test the current string's variable text.
When a string has any of the [Var X] tags (0-7), then these can be filled dynamically by map or battle scripting, instead of needing different versions of static strings.
This functionality is used, for example, for shop keeper dialogue and the item sockets on Shiver Mountain.
Modifying and Adding Text
Any existing string can be modified or overwritten using text files in your mod's strings/ directory or by defining strings with battle or map script files.
New strings can be added in the same way, you just have to make sure their string ID is not already in use (otherwise it will overwrite any existing string with the same ID).
Star Rod Sprite Editor
![]()
Under Construction
Quick notes:
- Sprite images must be indexed, and have at most 15 colors + 1 transparent (for this reason, aseprite or libresprite are the recommended sprite editors)
- Sprite widths must be divisible by 16, heights divisible by 8
- The width and height must be smaller than 256
- The transparent color will create a slight outline on the character in-game, if you set the transparent color to match the sprite outline you can mask this effect
Star Rod Themes Editor

Within the Themes Editor you can change the look and feel of Star Rod itself. This does not change anything about your mod and is purely cosmetic. The different interface objects on the right are sample objects that show a preview of your currently chosen theme.
Star Rod Tutorials
The following tutorials walk through different aspects of modding Paper Mario.
You should read them in order, but if you're looking for something specific, you can jump to a specific tutorial.
| Tutorial | Summary |
|---|---|
| Basic Patching | Change the music in the "Mail call!" cutscene |
| Add NPC to Map | Add Kent C. Koopa to Peach's Castle, First Floor (Day) |
Basic Patching
We're going to create a patch that changes the music that plays in the opening cutscene.
Source files
In Star Rod, any file that ends in .mscr, .bscr or .wscr is a source file. This tutorial will focus on .mscr files, but the method of patching described works for all different types.
.mscr files contain all the code used in overworld maps. Every file corresponds to an overworld map in the game. They are located in your mod directory, in map/src. The file we are going to patch is the one that corresponds to the first map that loads when you start the game, the Mario’s House map. The name of the file is kmr_20.mscr. When you open this file in a text editor, you see a bunch of blocks starting with a variation of #new:Function $Something_12345678 and ending with a closing brace: }. These are called Data Structures. All data structures are created with this exact format, where:
#new:Function= Tells Star Rod to create a new data structure of type “Function”.$Something_12345678= The name of the structure.
There are a lot of different types of data structures, but the two types you’ll find most commonly are Function and Script. In this tutorial, we are going to patch a script.
Finding the script to patch
To make changes to the opening cutscene, you need to find the script associated with it. This can be done in a variety of ways. The simplest method is by searching the file for dialogue used in the cutscene, because Star Rod provides a preview of any text that gets displayed from a script. The first bit of dialogue in the opening cutscene is “Mail call!”, said by Parakarry. If you search the file for this string, you will immediately find the script that makes that text appear, which is the opening cutscene. Scroll up a bit until you find the start, with the #new: bit. (At this point, you may already have found where the music gets set.)
Making a patch file
To change this script, you will need to make a patch file. Patch files are created in map/patch, and their name has to be the exact same as the file you’re patching, but with the extension .mpat instead of .mscr.
Copy the entire script (from the #new: part to the closing brace }) from the mscr file to the mpat file. To tell Star Rod that you’re patching a script that already exists instead of creating a new one, we replace the #new:Script with an @ symbol.
Your mpat file should now look like this:
@ $Script_8024FD70 {

}
With the contents of the script between the braces.
Now you can make your changes. A few lines into the script you can see a line that reads
Call SetMusicTrack ( 00000000 .Song:MailCall 00000000 00000008 )
To change which song is playing, simply edit the part after the .Song: to be a different track title. Say you want the final boss theme to play, you’d put FinalBowserBattle in there. For a list of all songs you can use here, look in your mod folder in globals/enum/songs.enum.
Compile your mod and start a new game, and you should hear the song you selected play during the opening cutscene!
Advanced
You might think it’s a bit excessive to copy and paste an entire script just to edit one line. Luckily, there is a shorter way to do it. In the script, you will see that every single line has a hexadecimal number at the start. This number indicates how far into the script this line of code is, also known as the offset of the line. You can patch that line specifically by specifying this offset in the patch as follows:
@ $Script_8024FD70 {
    [24] Call  SetMusicTrack ( 00000000 .Song:FinalBowserBattle 00000000 00000008 )
}
This will have the same effect as the original patch. Keep in mind that if you’re patching like this, the change you make has to be the exact same size as the original line.
Add NPC to Map
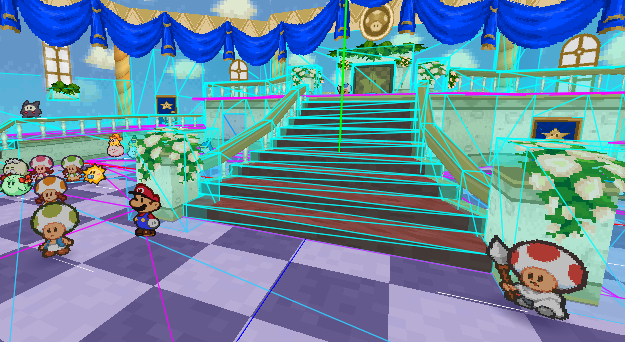
We're going to add Kent C Koopa to the first map in the game where Mario is given control, which is the Entry Hall of Peach's Castle. The engine name for this map is kkj_00.
Placing the NPC in the map
Open kkj_00.xml in the map editor, and think about where you want to place the NPC. Once you've found a good spot, hold down middle click and move Mario to that position in the 3D view.
On the right side of the Map Editor, go into the Markers tab. Click Create, then New Marker. A window will pop up. In the window, give your marker a name, set the type to NPC, and click OK. When you select the marker you've just created, a menu appears in the bottom right corner of the map editor. In this menu, click on the Animations tab. Here you can set the sprite you want your NPC to use, as well as its palette and basic animations.
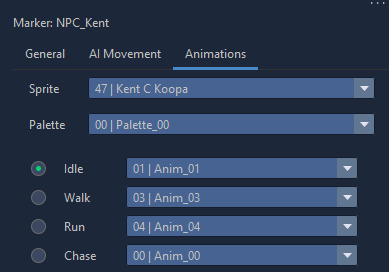
If you want, you can also give the NPC some basic movement in the AI Movement tab.
When you're done, save the map by pressing Ctrl+S. The NPC now has a position on the map, but if you compile and run the game now you'll notice he's not actually there.
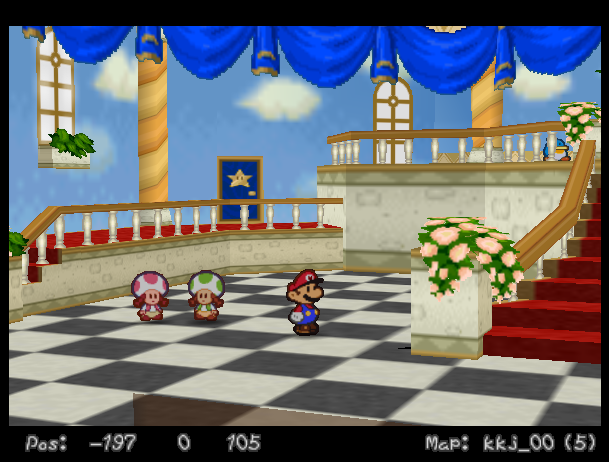
This is because we haven't told the game to actually place an NPC here yet.
Creating the NPC with code
Create a patch file for this map. You can do this from the map editor by clicking the Scripts tab in the top right, then clicking the Create Patch File button. After that you can click the Open Patch File button to immediately open the file in a text editor.
The NpcGroup
The basis for any NPC is an `NpcGroup``. This is the first thing we're going to create, and we're going to do it by copying one from the map on which Kent C. Koopa originally appears. If you're making an NPC based on one that already exists in a different map, this is the recommended way to do it.
#new:NpcGroup $NpcGroup_KentCKoopa {
	0000003F $NpcSettings_KentCKoopa ~Vec3f:NPC_Kent % -164 0 -37
	00002D01 $Script_Init_KentCKoopa 00000000 00000000 0000010E
	~NoDrops
	~Movement:NPC_Kent
	~AnimationTable:NPC_Kent % .Sprite:KentCKoopa
	00000000 00000000 00000000 00000000 % no tattle string
}
But what does all this mean? If you followed the patching tutorial, the #new:NpcGroup $NpcGroup_KentCKoopa should at least look familiar. The name of the data structure (specified after the $) can be anything, as long as you reference it correctly later. Inside the NpcGroup, there's quite a few sets of numbers:
0000003F- The NPC index. Make sure no other NPC on the map has the same index as your new NPC. Sincekkj_00already has so many NPCs, let's set this to3Fjust to be safe.$NpcSettings_KentCKoopa- The name of the NPC's NpcSettings structure. We'll create one of these later.~Vec3f:NPC_Kent- A reference to the marker you made earlier, make sure the marker name matches what you put after the colon here.00B44D04- NPC flags. Each flag has a certain functionality associated with it. A complete list of what these flags do can be found in the Paper Mario decomp (the NpcFlags enum). If you're copying an NPC from a different map, just leave this unchanged (for Kent C Koopa I ended up changing this to the flags used by a Toad because Kent's flags weren't working right). If you're making a new NPC and you're not sure how to use these flags, just copy them from an NPC that looks and behaves similar to yours.$Script_Init_KentCKoopa- The name of the NPC's Init script. We'll create one of these later.00000000- "initVarCount", just leave it at 0.00000000- "initVar", just leave it at 0.0000010E- Initial world yaw, or the rotation the NPC will have when it's spawned. If unsure, set this to 0.~NoDrops- Enemy drops after a battle. If your NPC is friendly, leave this at~NoDrops, otherwise look at enemy NpcGroups in the source files to see how to set up drops.~Movement:NPC_Kent- Movement data as defined in the "AI Movement" tab of the NPC marker in the map editor. Make sure the marker name matches what you put after the colon here. If you want your NPC to move around instead of just standing still the whole time, you can set up basic movement in this tab.~AnimationTable:NPC_Kent- A reference to the Animation tab of the NPC's marker. Once again, make sure the marker name matches what you put after the colon here.- The purpose of the next three sets of numbers is unknown.
00000000- Reference to a tattle string defined in "1A NPC Tattles.str".
The NpcSettings
$NpcGroup_KentCKoopa referenced $NpcSettings_KentCKoopa, so we need to create that next.
Let's copy this data from a similar (or identical) NPC from a different map.
#new:NpcSettings $NpcSettings_KentCKoopa {
	00000000 00440050 00000000 00000000 00000000 80077F70 00000000 8007809C
	00000000 00000000 00630000
}
(Make sure the name matches the name you gave it in the NpcGroup.)
Again there are a bunch of vague sets of numbers, but this time I am not going to explain what they all do in detail. There's only one set of numbers you need to be concerned with for now, and it's the second (in this example, it's the 00440050). This set of numbers defines the NPC's collision. The first four digits define the NPC's height (and also the height of the talk icon that appears above their head when Mario gets close), the last four define the radius. If you want to know what all the other sets of numbers do, look in the decomp (the NpcSettings struct).
The init script
Now create an init script for the NPC.
#new:Script $Script_Init_KentCKoopa {
    Return
    End
}
(Once again, make sure the name matches the name of the script in the NpcGroup.)
In this script, we tell the game what to do when the NPC is first created. The main purpose of this script is to define NPC behaviour for certain situations. There are six types of behaviour scripts to define here.
- Aux
- Idle
- AI
- Interact
- Hit
- Defeat
Generally, the only ones you will need are Idle, Interact and Defeat. For this NPC, only an Interact is necessary. Add an Interact script to the Init script as follows:
#new:Script $Script_Init_KentCKoopa {
    Call BindNpcInteract ( .Npc:Self $Script_Interact_KentCKoopa )
    Return
    End
}
(.Npc:Self refers to the NPC this script is attached to)
The interact script
Of course, this means you now have to create another script to define the Interact behaviour.
#new:Script $Script_Interact_KentCKoopa {
    Return
    End
}
The code in this script will run when the player approaches the NPC and presses A. Most NPCs will just talk to Mario, and nothing else.
To make the NPC speak, use the SpeakToPlayer function.
#new:Script $Script_Interact_KentCKoopa {
    Call SpeakToPlayer ( .Npc:Self 00470002 00470001 00000000 000C012D )
    Return
    End
}
The arguments for this function (the things between the braces) are:
- The index of the NPC saying the dialogue
- The NPC's talk animation
- The NPC's idle animation
- Message flags (just leave this at 0)
- The string to say (I'm using the dialogue he uses in the original map)
Modifying the NpcGroupList
Now the NPC itself is done, but the game still doesn't place it on the map. NPC's are created with the MakeNpcs function, which creates every NPC in the NpcGroupList you provide as an argument. In order for your new NPC to be created, you need to add it to the correct NpcGroupList.
If you look in kkj_00.mscr, you'll find that there's more than one NpcGroupList in the file. To find out which list you need to modify, check the NpcGroups in each list to see if they contain the NPCs you see when you enter the castle at the start of the game. Patch that NpcGroupList and add the new NpcGroup below the last one in the list.
An NpcGroupList entry has three parts:
- The amount of NPCs in the Group (in this case, that's just 1)
- The name of the NpcGroup
- The battle associated with the NpcGroup (
00000000if there's no associated battle). This follows the format AAAABBCC, where- AAAA = the battle area
- BB = the formation
- CC = the stage index
@ $NpcGroupList_802439C4 {
    0000000B $NpcGroup_80242474 00000000
    00000001 $NpcGroup_KentCKoopa 00000000
    00000000 00000000 00000000
}
(Make sure to leave that line of 0s at the bottom of the list, it tells the game where the list ends.)
Of course, if you're adding a custom NPC to a new map, you need to create the NpcGroupList from scratch (with #new:) instead of patching it, and you'll also need to add a MakeNpcs call to your map's $Script_Main. To see how that function works, look at the code of any map with NPCs on it.
Compile the game, and your NPC should now appear in the map!
Reference: Event Scripting
On each frame, the EVT manager will continue executing commands in all threads until a blocking command is encountered. This means that if you have a thread that loops but does not block between iterations, the game will freeze! Avoid this by inserting a blocking command such as EVT_WAIT(1) in the loop body.
Also note that threads are never executed in parallel. If your EVT script lacks blocking commands, it will be executed all in one go, and race conditions cannot occur.
The following subset of EVT commands are blocking:
EVT_EXEC_WAIT/ExecWaitEVT_WAIT/WaitEVT_WAIT_SECONDS/WaitSecondsEVT_CALL/Call(if function returns ApiStatus_BLOCK)
Reference: Event Scripting > Control Flow
Conditionals
Regular:
- decomp
EVT_IF_EQ(A, B)(equals)EVT_IF_NE(A, B)(not equals)EVT_IF_LT(A, B)(lower than)EVT_IF_GT(A, B)(greater than)EVT_IF_LE(A, B)(lower than or equal)EVT_IF_GE(A, B)(greater than or equal)
- Star Rod
If A == B(equals)If A != B(not equals)If A < B(lower than)If A > B(greater than)If A <= B(lower than or equal)If A >= B(greater than or equal)
Conditional statements behave exactly as you might expect.
Flag bits related:
- decomp
EVT_IF_FLAG(A, B)(bitwise check if bit B is set on value A)EVT_IF_NOT_FLAG(A, B)(bitwise check if bit B is not set on value A)
- Star Rod
If ((A & B) != 0)(bitwise check if bit B is set on value A)If ((A & B) == 0)(bitwise check if bit B is not set on value A)
Note that the bitwise AND conditions treat the second argument as a constant. This means that they will not try to dereference script variables so you should NOT supply them with *Var[X], etc. They are intended to check whether certain flags are set for the first argument.
EVT_ELSE (decomp) / Else (Star Rod)
(optional) Begins the block to be executed if the above If condition is false.
EVT_END_IF (decomp) / EndIf (Star Rod)
Designates the end of an If..EndIf or If..Else..EndIf body.
Switch Case
EVT_SWITCH(A) (decomp) / Switch VarA (Star Rod)
Begins a switch statement using the given variable. Up to 8 switch statements may be nested within a single script.
EVT_SWITCH_CONST(A) (decomp) / SwitchConst A (Star Rod)
Begins a switch statement using the given constant.
- decomp
EVT_CASE_EQ(B)(equals)EVT_CASE_NE(B)(not equals)EVT_CASE_LT(B)(lower than)EVT_CASE_GT(B)(greater than)EVT_CASE_LE(B)(lower than or equals)EVT_CASE_GE(B)(greater than or equals)EVT_CASE_FLAG(B)(bitwise AND not equals zero)EVT_CASE_RANGE(B, C)(B <= SwitchVar <= C)
- Star Rod
Case == B(equals)Case != B(not equals)Case < B(lower than)Case > B(greater than)Case <= B(lower than or equals)Case >= B(greater than or equals)Case & B(bitwise AND not equals zero)Case B to C(B <= SwitchVar <= C)
Begins the block to be executed if the condition is true. Unlike the switch you might be used to, these cases do not support fallthrough.
EVT_CASE_OR_EQ(B) (decomp) / CaseOR [COND] B (Star Rod)
Several of these cases may appear in series. The clause is executed if any values are equal. These cases support fall-though, so every subsequent clause will be executed until a normal case or EndCaseGroup is encountered.
EVT_CASE_AND_EQ(B) (decomp) / CaseAND [COND] B (Star Rod)
Several of these cases may appear in series. All conditions must be satisfied for the clause to executed. Unused in the original code, intended use-case unknown. Potentially useful for SwitchConst blocks to check multiple variables against the constant.
EVT_END_CASE_GROUP (decomp) / EndCaseGroup (Star Rod)
Terminates a CaseOR or CaseAND fall-though/matching group.
EVT_CASE_DEFAULT (decomp) / Default (Star Rod)
Begins the block to be executed if no preceding conditions matched.
EVT_BREAK_SWITCH (decomp) / BreakCase (Star Rod)
Jumps out of a case clause to the end of the switch block.
EVT_END_SWITCH (decomp) / EndSwitch (Star Rod)
Ends a switch statement.
Jump and Goto Commands
EVT_JUMP(EvtSource) (decomp) / Jump $EvtSource (Star Rod)
Jumps to a given instruction pointer and begins execution from there. You can jump to a different EVT source and labels etc. will be loaded as expected. The timescale for the current thread is also reset to the global default.
EVT_LABEL(Label_ID) (decomp) / Label Label_ID (Star Rod)
Marks this point in the script as a EVT_GOTO target. Range: 0 <= Label_ID <= 0x16
EVT_GOTO(Label_ID) (decomp) / Goto Label_ID (Star Rod)
Moves execution to the given label.
Wait Commands
EVT_WAIT(A) (decomp) / Wait A (Star Rod)
Blocks the current thread for the given number of frames.
EVT_WAIT_SECS(A) (decomp)
Blocks the current thread for the given number of seconds. Unused.
Loops
EVT_LOOP(A) (decomp) / Loop A (Star Rod)
Repeat the following commands a certain number of times. To create an infinite loop, use A = 0. Star Rod assumes the iteration count is zero if no argument is provided.
Note: passing a variable will decrement the variable after each iteration until it equals zero. If the variable is zero before the loop begins, the loop will be infinite; make sure it breaks or blocks to avoid a freeze.
Up to 8 loops may be nested within a single script.
EVT_BREAK_LOOP (decomp) / BreakLoop (Star Rod)
Immediately jump out of a loop and continue execution after the next EndLoop command.
EVT_END_LOOP (decomp) / EndLoop (Star Rod)
Designates the end of a loop body.
Reference: Event Scripting > Threads / Script Calls
Main Threads
EVT_EXEC(EvtSource) (decomp) / Exec $EvtSource() (Star Rod)
Launches a new script, starting at the specified location. This location does not need to be at the beginning of the script.
The new script does not block its parent (it'll run in the background, i.e. in a new thread), and will continue executing even if the parent terminates.
The new script starts execution the following frame that this is called, not immediately.
EVT_EXEC_GET_TID(EvtSource, TID) (decomp)
Identical to EVT_EXEC, but the newly-launched thread ID is stored in a provided variable.
The new thread may be interacted with using EVT_KILL_THREAD, EVT_SUSPEND_THREAD, EVT_RESUME_THREAD, and EVT_IS_THREAD_RUNNING
EVT_EXEC_WAIT(EvtSource) (decomp) / ExecWait $EvtSource() (Star Rod)
Launches a new child thread. Blocks for at least one frame unless the child thread is made to have a higher priority than the parent. Stops blocking the parent thread only once the child thread returns.
Child threads are killed, suspended, and resumed as their parents are, for example, a different thread using EVT_KILL_THREAD to kill a parent thread would also kill its child thread(s) launched by this command.
EVT_RETURN (decomp) / Return (Star Rod)
Finish script execution and destroy it. If the script has a parent (script[68] != null), copy script flags and variables to its parent.
EVT_END (decomp) / End (Star Rod)
Indicates the end of the script for parsing purposes. Required for all scripts for the interpreter to correctly parse them. Does not do anything in-game.
EVT_KILL_THREAD(TID) (decomp) / Kill TID (Star Rod)
Terminates the script with the given thread ID, and any ChildThreads.
EVT_CALL(Func, Args...) (decomp) / Call $Func(Args...) (Star Rod)
Calls a given C EVT API function with any number of arguments.
This is used for executing code that is written in C, and not the EVT scripting language.
The API function called will execute every frame unless it returns 2 on register V0.
Forgetting to return 2 without proper measures to handle this on the EVT script side may cause a freeze.
EVT_IS_THREAD_RUNNING(TID, Result) (decomp) / DoesScriptExist TID Result (Star Rod)
Sets Result variable to True/False depending on whether a thread with given thread ID exists (i.e. has not been killed).
EVT_SET_PRIORITY(A) (decomp) / SetPriority A (Star Rod)
Sets the current thread's priority. Higher-priority threads execute before lower-priority threads on each frame.
EVT_SET_TIMESCALE(A) (decomp) / SetTimescale A (Star Rod)
Sets the current thread's timescale. This is a multiplier applied to EVT_WAIT and EVT_WAIT_SECONDS.
EVT_SUSPEND_THREAD(TID) (decomp) / Suspend TID (Star Rod)
Suspends a thread by its thread ID.
EVT_RESUME_THREAD(TID) (decomp) / Resume TID (Star Rod)
Resumes a thread by its thread ID.
EVT_SET_GROUP(A) (decomp) / SetGroup A (Star Rod)
Sets the current thread's group. Group value meanings are currently not known.
EVT_SUSPEND_GROUP(A) (decomp) / SuspendAll A (Star Rod)
Suspends all threads in a group.
EVT_RESUME_GROUP(A) (decomp) / ResumeAll A (Star Rod)
Resumes all threads in a group.
EVT_SUSPEND_OTHERS(A) (decomp)
Suspends all threads in a group, except the current thread. Unused.
EVT_RESUME_OTHERS(A) (decomp)
Resumes all threads in a group, except the current thread. Unused.
Child Threads
EVT_THREAD (decomp) / Thread (Star Rod)
Begins a temporary helper block that executes some tasks in parallel with the main thread. Vars and flags are copied to the thread but are not copied back after the thread finishes. The thread can also outlive its parent.
EVT_END_THREAD (decomp) / EndThread (Star Rod)
Designates the end of a Thread block.
EVT_CHILD_THREAD (decomp) / ChildThread (Star Rod)
Similar to Thread, but the child thread shares variables and flags with the parent and will be terminated if the parent script ends.
EVT_END_CHILD_THREAD (decomp) / EndChildThread (Star Rod)
Designates the end of a ChildThread block.
Binding Threads
EVT_BIND_TRIGGER(EVT_SOURCE, TRIGGER, COLLIDER_ID, UNK_A3, TRIGGER_PTR_OUTVAR) (decomp)
Bind $Script TRIGGER, COLLIDER_ID, UNK_A3, TRIGGER_PTR_OUTVAR (Star Rod)
Sets up a script to launch when a particular event is triggered. Valid triggers:
- TRIGGER_WALL_PUSH
- TRIGGER_FLOOR_TOUCH
- TRIGGER_WALL_PRESS_A (displays "!" icon above player)
- TRIGGER_FLOOR_JUMP
- TRIGGER_WALL_TOUCH
- TRIGGER_FLOOR_PRESS_A
- TRIGGER_WALL_HAMMER
- TRIGGER_GAME_FLAG_SET
- TRIGGER_AREA_FLAG_SET
- TRIGGER_CEILING_TOUCH
- TRIGGER_FLOOR_ABOVE
- TRIGGER_POINT_BOMB (takes Vec3f* instead of collider ID)
For the COLLIDER_ID param, the following values are accepted:
- Collider ID
- Entity ID (use EVT_ENTITY_INDEX)
- Pointer to a Vec3f (for TRIGGER_POINT_BOMB only)
Only one thread will run for a trigger at once. Triggers will not re-activate until the associated script returns.
EVT_BIND_PADLOCK(EVT_SOURCE, TRIGGER, COLLIDER_ID, ITEM_LIST, UNK_A3, TRIGGER_PTR_OUTVAR) (decomp)
BindLock $Script TRIGGER, COLLIDER_ID, $ItemList, UNK_A3, TRIGGER_PTR_OUTVAR (Star Rod)
Similar to EVT_BIND_TRIGGER, but also takes arguments for the item list to show. Used whenever an event trigger is supposed to open an item list for the player to choose from. Despite being called "PADLOCK", and this type of binding indeed being used for padlocks, this EVT can also be used in other scripting.
EVT_UNBIND (decomp) / Unbind (Star Rod)
Unbinds the current thread from the trigger it was bound to, if any. Makes it so the trigger will no longer call the current thread, effectively deactivating the trigger. Usually used at the end of a bound thread.
Reference: Event Scripting > Variables
Types of Variables
Local Variables
Local variables do not need to be declared. They are automatically available upon starting a thread / script and are initialized to 0 / FALSE.
LocalVar(INDEX) (decomp) / *Var[INDEX] or *VarINDEX (Star Rod)
Local Word. A variable local to the current thread.
LWs are copied to any threads created by this one (EVT_EXEC, EVT_EXEC_WAIT, EVT_THREAD, EVT_CHILD_THREAD).
Additionally, EVT_EXEC_WAIT copies LWs back from the spawned thread when it completes.
Max. value: 4294967295 / FFFFFFFF
Range for INDEX: 0 <= v < 0x10:
LocalVar(0) to LocalVar(15) (decomp) / *Var0 to *VarF (Star Rod)
LocalFlag(INDEX) (decomp) / *Flag[INDEX] (Star Rod)
Local Flag. A boolean variable local to the current thread.
LFs are copied to any threads created by this one (EVT_EXEC, EVT_EXEC_WAIT, EVT_THREAD, EVT_CHILD_THREAD).
Additionally, EVT_EXEC_WAIT copies LFs back from the spawned thread when it completes.
Range for INDEX: 0 <= v < 0x60:
LocalFlag(0) to LocalFlag(95) (decomp) / *Flag[0] to *Flag[59] (Star Rod)
Map Variables
Map variables do not need to be declared. They are automatically available upon entering a map and are initialized to 0 / FALSE.
MapVar(INDEX) (decomp) / *MapVar[INDEX] or *MapVarINDEX (Star Rod)
Global Word. A variable global to all threads. Cleared upon entering a new map.
Max. value: 4294967295 / FFFFFFFF
Range for INDEX: 0 <= v < 0x10:
MapVar(0) to MapVar(15) (decomp) / *MapVar0 to *MapVarF (Star Rod)
MapFlag(INDEX) (decomp) / *MapFlag[INDEX] (Star Rod)
Global Flag. A boolean variable global to all threads. Cleared upon entering a new map.
Range for INDEX: 0 <= v < 0x60:
MapFlag(0) to MapFlag(15) (decomp) / *MapFlag[0] to *MapFlag[59] (Star Rod)
Area Variables
Area variables do not need to be declared. They are automatically available upon entering an area and are initialized to 0 / FALSE.
AreaByte(INDEX) (decomp) / *AreaByte[INDEX] (Star Rod)
Local Saved Byte. A variable local to the current world area, saved in the savefile. Cleared upon a new world area.
Max. value: 255 / FF
Rarely used. Most common use is for NPCs with dialogue that changes depending on the number of times you have interacted with them in their 'recent memory' (i.e. until you leave the area).
Range for INDEX: 0 <= v < 0x10:
AreaByte(0) to AreaByte(15) (decomp) / *AreaByte[0] to *AreaByte[F] (Star Rod)
AreaFlag(INDEX) (decomp) / *AreaFlag[INDEX] (Star Rod)
Local Save World Flag. A boolean variable local to the current world area, saved in the savefile. Cleared upon entering a new world area.
Used to track whether badges, items, etc. have been collected or whether NPCs have been interacted with.
Range for INDEX: 0 <= v < 0x100:
AreaFlag(0) to AreaFlag(255) (decomp) / *AreaFlag[0] to *AreaFlag[FF] (Star Rod)
Game Variables
GameByte(INDEX) (decomp) / *GB_NAME (Star Rod)
Global Saved Byte. A variable saved in the save file. Used for almost all savefile states.
Star Rod assigns all GameBytes a custom name, which a Byte can be called by. E.g. instead of accessing *GameByte[000] one usually uses *GB_StoryProgress.
For a list of all of these aliases, see the globals/GameBytes.txt file within your mod folder.
If you want to add your own Bytes that are saved to the save file within Star Rod, then add them to globals/ModBytes.txt with the format of INDEX = NameOfByte, e.g. 000 = MB_MyCoolModByte.
Max. value: 255 / FF
GameFlag(INDEX) (decomp) / *GF_NAME (Star Rod)
Global Save World Flag. A boolean variable saved in the savefile.
Used to track whether badges, items, etc. have been collected or whether NPCs have been interacted with.
Star Rod assigns all GameFlags a custom name, which a Flag can be called by. E.g. instead of accessing *GameFlag[001] one usually uses *GF_StartedChapter1.
For a list of all of these aliases, see the globals/GameFlags.txt file within your mod folder.
If you want to add your own Flags that are saved to the save file within Star Rod, then add them to globals/ModFlags.txt with the format of INDEX = NameOfByte, e.g. 0000 = MF_MyCoolModFlag.
Arrays
Array variables need to be declared by using their corresponding EVT_USE_ARRAY calls to become usable within the current thread.
ArrayVar(INDEX) (decomp) / *Array[INDEX] (Star Rod)
User Word. A variable stored within the current thread's array.
You can load an array with EVT_USE_ARRAY or temporarily allocate one with EVT_MALLOC_ARRAY, then get/set values with ArrayVar(INDEX)
Range: 0 <= v
ArrayFlag(INDEX) (decomp)
User Flag. A boolean variable stored within the current thread's flag array.
The flag array is distinct from the word array.
Variable Operations
EVT_SET(Var, IntValue) (decomp) / Set *Var IntValue (Star Rod)
Sets the given variable to a given value cast to an integer.
EVT_SET_CONST(Var, B) (decomp) / SetConst *Var B (Star Rod)
Sets a variable to B.
If B is also a variable, this copies the reference of B into A. Effectively, this treats B as a "compile-time" constant. You can then use Call SetValueByRef and Call GetValueByRef to set the value referenced.
When used with a non-variable B, SetConst acts identically to Set.
EVT_SETF(Var, FloatValue) (decomp) / Set *Var FloatValue (Star Rod)
Sets the given variable to a given value, but supports EVT_FLOATs.
Basic Arithmatic Operations
EVT_ADD(Var, B)(decomp) /Add *Var B(Star Rod)EVT_SUB(Var, B)(decomp) /Sub *Var B(Star Rod)EVT_MUL(Var, B)(decomp) /Mul *Var B(Star Rod)EVT_DIV(Var, B)(decomp) /Div *Var B(Star Rod)EVT_MOD(Var, B)(decomp) /Mod *Var B(Star Rod)
B can be a static number or a variable. Writes the result of the operation back into Var.
Basic Floating-point Arithmetic Operations
EVT_ADDF(Var, FloatB)(decomp) /AddF *Var FloatB(Star Rod)EVT_SUBF(Var, FloatB)(decomp) /SubF *Var FloatB(Star Rod)EVT_MULF(Var, FloatB)(decomp) /MulF *Var FloatB(Star Rod)EVT_DIVF(Var, FloatB)(decomp) /DivF *Var FloatB(Star Rod)
FloatB can be a static number or a variable. Writes the result of the operation back into Var.
Array Operations
EVT_USE_ARRAY(INT_PTR) (decomp) / UseArray $Array (Star Rod)
Loads an s32 array pointer into the current thread. This has to be called before the array can be used.
EVT_USE_FLAG_ARRAY(PACKED_FLAGS_PTR) (decomp)
Loads an s32 array pointer into the current thread for use with ArrayFlag(INDEX). Flags are stored in a 'packed' structure where indices refer to bits.
EVT_MALLOC_ARRAY(SIZE, OUT_PTR_VAR) (decomp)
Allocates a new array of the given size for use with ArrayVar(INDEX). EVT scripts do not have to worry about freeing this array.
Within Star Rod this function is not available, instead all arrays for a map or battle script file have to be pre-defined and accessed via UseArray.
Global API Functions
Many API functions for calling C code are available globally, so they can be accessed from any map or battle script file.
These API functions are called using the EVT_CALL() / Call EVT operation, and they may modify both their function argument variables as well as variables local to the current thread (LocalVar() / *Var).
Usage examples:
EVT_CALL(DisablePlayerInput, TRUE)(decomp)Call DisablePlayerInput (.True)(Star Rod)
Generated documentation for all global API functions is available here.
Player functions
Disable8bitMario, BOOL (decomp) / Disable8bitMario (BOOL) (Star Rod)
Enables and disables the 8-bit Mario easter egg.
DisablePartner, INT (decomp) / DisablePartner (INT) (Star Rod)
Disables the partner with the provided partner ID.
See also: EnablePartner
DisablePlayerInput, BOOL (decomp) / DisablePlayerInput (BOOL) (Star Rod)
Disables and reenables the player input.
This function can disable all player inputs for controlling Mario and his partner (or Peach), and to disable opening the pause menu, partner menu or item menu. This is most commonly done to start cutscenes.
This also disables Mario's spin, should he be in a spinning animation.
Internally, this is not tracked as a boolean flag, but rather as integer. The player is only in control while this integer equals 0, and calling DisablePlayerInput, TRUE adds 1 to that integer, while calling DisablePlayerInput, FALSE subtracts 1.
This is done so multi-layered scripts, which each try to disable the player input on their own, don't give back control too early.
DisablePlayerPhysics, BOOL (decomp) / DisablePlayerPhysics (BOOL) (Star Rod)
Disables and reenables the player physics.
This function can disable all player physics. This causes the physics system to no longer force gravity on the player, and physics-related animations no longer play automatically (like setting Mario's / Peach's running animation when forced to move via EVT script).
Internally, this is not tracked as a boolean flag, but rather as integer. The player is only in control while this integer equals 0, and calling DisablePlayerPhysics, TRUE adds 1 to that integer, while calling DisablePlayerPhysics, FALSE subtracts 1.
This is done so multi-layered scripts, which each try to disable the player physics on their own, don't reenable these too early.
DisablePulseStone, BOOL (decomp) / DisablePulseStone (BOOL) (Star Rod)
Enables and disables the blinking Pulse Stone speech bubble. However, the Pulse Stone speech bubble is programmed to only show in the SBK area and only within certain maps.
EnablePartner, INT (decomp) / EnablePartner (INT) (Star Rod)
Enables the partner with the provided partner ID.
See also: DisablePartner
FacePlayerTowardPoint, FLOAT_X, FLOAT_Y, INT (decomp) 802D2884 (FLOAT_X, FLOAT_Y, INT) (Star Rod)
Turns the player character towards a given point (FLOAT_X, FLOAT_Y) over the duration of INT frames.
ForceUsePartner (decomp) / 802D2B50 () (Star Rod)
Forces the player to use the currently active partner's overworld ability. This circumvents partner abilities usually only being triggered by a C-Down input while player input is enabled.
FullyRestoreHPandFP (decomp) / FullyRestoreHPandFP () (Star Rod)
Sets the player's HP and FP equal to their current maximum HP and FP.
FullyRestoreSP (decomp) / FullyRestoreSP () (Star Rod)
Sets the player's SP equal to their current maximum SP.
func_802D2C14
func_802D1270
func_802D1380
func_802D2148
func_802D2484
GetPartnerInUse, *INT (decomp) / GetCurrentPartner (*INT) (Star Rod)
Returns the partnerID of the current partner if they're using their ability, otherwise returns PARTNER_NONE.
GetPlayerActionState, *INT (decomp) / GetPlayerActionState (*INT) (Star Rod)
Returns the ID of the player's current action state.
GetPlayerAnimation, *INT (decomp) / GetPlayerAnimation (*INT) (Star Rod)
Returns the ID of the player's current animation.
GetPlayerPos, *INT_X, *INT_Y, *INT_Z (decomp) / GetPlayerPos (*INT_X, *INT_Y, *INT_Z) (Star Rod)
Returns the player's current position.
GetPlayerTargetYaw, *FLOAT (decomp) / GetPlayerTargetYaw (*FLOAT) (Star Rod)
Returns the player's current target yaw. Since EVT calls like PlayerFaceNpc can make the player turn towards a certain target over several frames, this EVT call can be used to check the goal value of this ongoing turning action.
HidePlayerShadow, BOOL (decomp) / HidePlayerShadow (BOOL) (Star Rod)
Disables and reenables the player character's shadow.
InterpPlayerYaw, *FLOAT, *INT (decomp) / InterpPlayerYaw (*FLOAT, *INT) (Star Rod)
Turns the player towards target yaw value FLOAT over INT frames.
InterruptUsePartner (decomp) / 802D2B6C ( ) (Star Rod)
Immediately interrupts any partner overworld ability in progress.
IsPlayerOnValidFloor, *BOOL (decomp) / IsPlayerOnValidFloor (*BOOL) (Star Rod)
Returns whether the player is in contact with valid groud currently.
PlayerFaceNpc, INT_X, INT_Y (decomp) / PlayerFaceNpc ( INT_X, INT_Y ) (Star Rod)
Turns the player towards the Npc with ID INT_X and locks the player facing to follow the target for INT_Y frames. This is mostly used with INT_Y = 0 to just turn the player once.
PlayerJump, FLOAT_X, FLOAT_Y, FLOAT_Z, INT (decomp) / PlayerJump ( FLOAT_X, FLOAT_Y, FLOAT_Z, INT ) (Star Rod)
Makes the player jump towards target location (FLOAT_X, FLOAT_Y, FLOAT_Z) over INT frames. If INT equals zero, then the player's current movespeed value is used to calculate the duration of the jump.
This function uses mode 0 of the internal player_jump function, which plays a jumping sound, changes the player's animation to a jumping animation fitting the current status (default, holding Watt, 8bit Mario), turns the player towards the jump goal, and checks for collider behavior when landing at the end of the jump.
PlayerJump1, FLOAT_X, FLOAT_Y, FLOAT_Z, INT (decomp) / PlayerJump1 ( FLOAT_X, FLOAT_Y, FLOAT_Z, INT ) (Star Rod)
Makes the player jump towards target location (FLOAT_X, FLOAT_Y, FLOAT_Z) over INT frames. If INT is zero, then the player's current movespeed value is used to calculate the duration of the jump.
This function uses mode 1 of the internal player_jump function, which does not play a jumping sound, does not change the player's animation to a jumping animation fitting the current status (default, holding Watt, 8bit Mario), does not turn the player towards the jump goal, and does not check for collider behavior when landing at the end of the jump.
PlayerJump2, FLOAT_X, FLOAT_Y, FLOAT_Z, INT (decomp) / PlayerJump2 ( FLOAT_X, FLOAT_Y, FLOAT_Z, INT ) (Star Rod)
Makes the player jump towards target location (FLOAT_X, FLOAT_Y, FLOAT_Z) over INT frames. If INT is zero, then the player's current movespeed value is used to calculate the duration of the jump.
This function uses mode 2 of the internal player_jump function, which does not play a jumping sound, does not change the player's animation to a jumping animation fitting the current status (default, holding Watt, 8bit Mario), does not turn the player towards the jump goal, and checks for collider behavior when landing at the end of the jump.
PlayerMoveTo, FLOAT_X, FLOAT_Y, FLOAT_Z (decomp) / PlayerMoveTo ( FLOAT_X, FLOAT_Y, FLOAT_Z ) (Star Rod)
Makes the player move towards given X/Y coordinate (FLOAT_X, FLOAT_Y) over FLOAT_Z frames. If FLOAT_Z equals zero, then the player's current movespeed value is used to calculate the duration of the move.
PlaySoundAtPlayer, INT_X, INT_Y (decomp) / PlaySoundAtPlayer ( INT_X, INT_Y ) (Star Rod)
Plays sound effect with ID INT_X at the player current location, using sound flags INT_Y.
SetPlayerActionState, INT (decomp) / SetPlayerActionState ( INT ) (Star Rod)
Sets the player's action state to the action state with ID INT.
SetPlayerAnimation, INT (decomp) / SetPlayerAnimation (INT) (Star Rod)
Sets the player's current animation to a given animation ID. This will get overwritten immediately by the physics engine, if the physics are not disabled and the player is moving in some way or controller input is made.
If the chosen animation is ANIM_MarioW2_Collapse, then also shakes the camera for a short moment.
SetPlayerAnimationSpeed, FLOAT (decomp) / SetPlayerAnimationSpeed ( FLOAT ) (Star Rod)
UNUSED! Sets the player's animation speed to FLOAT (default 1.0).
SetPlayerCollisionSize, INT_HEIGHT, INT_RADIUS (decomp) / SetPlayerPos (INT_HEIGHT, INT_RADIUS) (Star Rod)
Sets the player's collision size, colloquially called the hit box.
SetPlayerFlagBits, INT, BOOL (decomp) / SetPlayerFlagBits ( INT BOOL ) (Star Rod)
Sets the player's given flags, represented by flag bits INT, to BOOL.
SetPlayerImgFXFlags INT (decomp) / 802D286C ( INT ) (Star Rod)
Sets flags represented by INT for the player's ImgFX. Used before calling UpdatePlayerImgFX.
SetPlayerJumpscale, FLOAT (decomp) / SetPlayerJumpscale (FLOAT) (Star Rod)
Sets the player's jump scale. This determines how quickly a jump started by a script (not by player input) is performed. The player moves along the jump arc slower or faster, depending on the jump scale.
SetPlayerPos, INT_X, INT_Y, INT_Z (decomp) / SetPlayerPos (INT_X, INT_Y, INT_Z) (Star Rod)
Sets the player's position immediately.
SetPlayerPushVelocity, FLOAT_X, FLOAT_Y, FLOAT_Z (decomp) / SetPlayerPushVelocity ( FLOAT_X FLOAT_Y FLOAT_Z ) (Star Rod)
UNUSED! Sets the player's current push velocity to (FLOAT_X, FLOAT_Y, FLOAT_Z).
SetPlayerSpeed, FLOAT (decomp) / SetPlayerSpeed (FLOAT) (Star Rod)
Sets the player's grounded movement speed. This automatically reset once the player input gets enabled.
UpdatePlayerImgFX, INT_1, INT_2, INT_3, INT_4, INT_5 (decomp) / 802D2520 ( INT_1 INT_2 INT_3 INT_4 INT_5 ) (Star Rod)
Clears the player's ImgFX, then applies parameters INT_2 to INT_5 to chosen special sprite effect INT_1 to cause a new ImgFX. These effects can be a holographic effect, color tinting, changing the alpha, making the player sprite wavy, and more. Used after calling SetPlayerImgFXFlags.
UseEntryHeading, INT_X, INT_Y (decomp) / UseEntryHeading ( INT_X, INT_Y ) (Star Rod)
Used internally by the EnterWalk group of functions.
UseExitHeading, INT_X, INT_Y (decomp) / UseExitHeading ( INT_X, INT_Y ) (Star Rod)
Called before ExitWalk to set the player's "walk-off" animation target using a given walk-off length INT_X and entry ID INT_Y. This modifies the calling script's Var1, Var2 and Var3 values for use by ExitWalk.
WaitForPlayerInputEnabled (decomp) / WaitForPlayerInputEnabled ( ) (Star Rod)
Stops the current script and loops infinitely until player input is enabled.
WaitForPlayerMoveToComplete (decomp) / WaitForPlayerMoveToComplete ( ) (Star Rod)
Stops the current script and loops infinitely until the current player move is complete.
WaitForPlayerTouchingFloor (decomp) / WaitForPlayerTouchingFloor ( ) (Star Rod)
Stops the current script and loops infinitely until player touches any valid floor from above, landing on it.
Camera Function
AdjustCam(Evt* script, s32 isInitialCall)
func_802CA90C(Evt* script, s32 isInitialCall)
func_802CA988(Evt* script, s32 isInitialCall)
func_802CABE8(Evt* script, s32 isInitialCall)
func_802CACC0(Evt* script, s32 isInitialCall)
func_802CAE50(Evt* script, s32 isInitialCall)
func_802CB710(Evt* script, s32 isInitialCall)
GetCamDistance(Evt* script, s32 isInitialCall)
GetCamPitch(Evt* script, s32 isInitialCall)
GetCamPosA(Evt* script, s32 isInitialCall)
GetCamPosB(Evt* script, s32 isInitialCall)
GetCamPosC(Evt* script, s32 isInitialCall)
GetCamPosition(Evt* script, s32 isInitialCall)
GetCamType(Evt* script, s32 isInitialCall)
InterpCamTargetPos(Evt* script, s32 isInitialCall)
LoadSettings(Evt* script, s32 isInitialCall)
PanToTarget(Evt* script, s32 isInitialCall)
ResetCam(Evt* script, s32 isInitialCall)
SetCamBGColor(Evt* script, s32 isInitialCall)
SetCamDistance(Evt* script, s32 isInitialCall)
SetCamEnabled(Evt* script, s32 isInitialCall)
SetCamFlag80(Evt* script, s32 isInitialCall)
SetCamLeadPlayer(Evt* script, s32 isInitialCall)
SetCamPerspective(Evt* script, s32 isInitialCall)
SetCamPitch(Evt* script, s32 isInitialCall)
SetCamPosA(Evt* script, s32 isInitialCall)
SetCamPosB(Evt* script, s32 isInitialCall)
SetCamPosC(Evt* script, s32 isInitialCall)
SetCamProperties(Evt* script, s32 isInitialCall)
SetCamSpeed(Evt* script, s32 isInitialCall)
SetCamTarget(Evt* script, s32 isInitialCall)
SetCamType(Evt* script, s32 isInitialCall)
SetCamViewport(Evt* script, s32 isInitialCall)
SetPanTarget(Evt* script, s32 isInitialCall)
ShakeCam(Evt* script, s32 isInitialCall)
UseSettingsFrom(Evt* script, s32 isInitialCall)
WaitForCam(Evt* script, s32 isInitialCall)
Map Function
CloneModel(Evt* script, s32 isInitialCall)
EnableGroup(Evt* script, s32 isInitialCall)
EnableModel(Evt* script, s32 isInitialCall)
EnableTexPanning(Evt* script, s32 isInitialCall)
GetColliderCenter(Evt* script, s32 isInitialCall)
GetEntryID(Evt* script, s32 isInitialCall)
GetLoadType(Evt* script, s32 isInitialCall)
GetMapID(Evt* script, s32 isInitialCall)
GetModelCenter(Evt* script, s32 isInitialCall)
GetModelIndex(Evt* script, s32 isInitialCall)
GetTransformGroup(Evt* script, s32 isInitialCall)
GotoMap(Evt* script, s32 isInitialCall)
GotoMapByID(Evt* script, s32 isInitialCall)
GotoMapSpecial(Evt* script, s32 isInitialCall)
InvalidateModelTransform(Evt* script, s32 isInitialCall)
MakeLocalVertexCopy(Evt* script, s32 isInitialCall)
MakeTransformGroup(Evt* script, s32 isInitialCall)
ModifyColliderFlags(Evt* script, s32 isInitialCall)
ParentColliderToModel(Evt* script, s32 isInitialCall)
PlaySoundAtCollider(Evt* script, s32 isInitialCall)
PlaySoundAtModel(Evt* script, s32 isInitialCall)
ResetFromLava(Evt* script, s32 isInitialCall)
RotateGroup(Evt* script, s32 isInitialCall)
RotateModel(Evt* script, s32 isInitialCall)
ScaleGroup(Evt* script, s32 isInitialCall)
ScaleModel(Evt* script, s32 isInitialCall)
SetCustomGfx(Evt* script, s32 isInitialCall)
SetCustomGfxBuilders(Evt* script, s32 isInitialCall)
SetCustomGfxEnabled(Evt* script, s32 isInitialCall)
SetGroupVisibility(Evt* script, s32 isInitialCall)
SetModelCustomGfx(Evt* script, s32 isInitialCall)
SetModelFlags(Evt* script, s32 isInitialCall)
SetModelTexVariant(Evt* script, s32 isInitialCall)
SetRenderMode(Evt* script, s32 isInitialCall)
SetTexPanner(Evt* script, s32 isInitialCall)
SetTexPanOffset(Evt* script, s32 isInitialCall)
SetTransformGroupEnabled(Evt* script, s32 isInitialCall)
SetZoneEnabled(Evt* script, s32 isInitialCall)
TranslateGroup(Evt* script, s32 isInitialCall)
TranslateModel(Evt* script, s32 isInitialCall)
UpdateColliderTransform(Evt* script, s32 isInitialCall)
Model Functions
AddAnimatedModelRootPosition(Evt* script, s32 isInitialCall)
ChangeModelAnimation(Evt* script, s32 isInitialCall)
DeleteAnimatedModel(Evt* script, s32 isInitialCall)
GetAnimatedModelRootPosition(Evt* script, s32 isInitialCall)
GetAnimatedNodePosition(Evt* script, s32 isInitialCall)
GetAnimatedNodeRotation(Evt* script, s32 isInitialCall)
GetAnimatedPositionByTreeIndex(Evt* script, s32 isInitialCall)
GetAnimatedRotationByTreeIndex(Evt* script, s32 isInitialCall)
InitAnimatedModels(Evt* script, s32 isInitialCall)
LoadAnimatedMesh(Evt* script, s32 isInitialCall)
LoadAnimatedModel(Evt* script, s32 isInitialCall)
PlayModelAnimation(Evt* script, s32 isInitialCall)
PlayModelAnimationStartingFrom(Evt* script, s32 isInitialCall)
SetAnimatedModelRenderMode(Evt* script, s32 isInitialCall)
SetAnimatedModelRootPosition(Evt* script, s32 isInitialCall)
SetAnimatedModelRootRotation(Evt* script, s32 isInitialCall)
SetAnimatedModelRootScale(Evt* script, s32 isInitialCall)
SetAnimatedNodeFlags(Evt* script, s32 isInitialCall)
SetAnimatorFlags(Evt* script, s32 isInitialCall)
Message Functions
CancelMessage(Evt* script, s32 isInitialCall)
CloseChoice(Evt* script, s32 isInitialCall)
CloseMessage(Evt* script, s32 isInitialCall)
ContinueSpeech(Evt* script, s32 isInitialCall)
EndSpeech(Evt* script, s32 isInitialCall)
func_802D0C94(Evt* script, s32 initialCall)
SetMessageImages(Evt* script, s32 isInitialCall)
SetMessageText(Evt* script, s32 isInitialCall)
SetMessageValue(Evt* script, s32 initialCall)
ShowChoice(Evt* script, s32 isInitialCall)
ShowMessageAtScreenPos(Evt* script, s32 isInitialCall)
ShowMessageAtWorldPos(Evt* script, s32 isInitialCall)
SpeakToNpc(Evt* script, s32 isInitialCall)
SpeakToPlayer(Evt* script, s32 isInitialCall)
SwitchMessage(Evt* script, s32 isInitialCall)
NPC Functions
ClearPartnerMoveHistory(Evt* script, s32 isInitialCall)
CreateNpc(Evt* script, s32 isInitialCall)
DeleteNpc(Evt* script, s32 isInitialCall)
DisablePartnerAI(Evt* script, s32 isInitialCall)
EnableNpcBlur(Evt* script, s32 isInitialCall)
EnableNpcShadow(Evt* script, s32 isInitialCall)
EnablePartnerAI(Evt* script, s32 isInitialCall)
func_802CF54C(Evt* script, s32 isInitialCall)
func_802CF56C(Evt* script, s32 isInitialCall)
GetCurrentPartnerID(Evt* script, s32 isInitialCall)
GetNpcAnimation(Evt* script, s32 isInitialCall)
GetNpcPointer(Evt* script, s32 isInitialCall)
GetNpcPos(Evt* script, s32 isInitialCall)
GetNpcYaw(Evt* script, s32 isInitialCall)
GetPartnerPos(Evt* script, s32 isInitialCall)
InterpNpcYaw(Evt* script, s32 isInitialCall)
NpcFaceNpc(Evt* script, s32 isInitialCall)
NpcFacePlayer(Evt* script, s32 isInitialCall)
NpcFlyTo(Evt* script, s32 isInitialCall)
NpcJump0(Evt* script, s32 isInitialCall)
NpcJump1(Evt* script, s32 isInitialCall)
NpcMoveTo(Evt* script, s32 isInitialCall)
NpcSetHomePosToCurrent(Evt* script, s32 isInitialCall)
PartnerCanUseAbility(Evt* script, s32 isInitialCall)
PartnerIsFlying(Evt* script, s32 isInitialCall)
PlaySoundAtNpc(Evt* script, s32 isInitialCall)
PutPartnerAway(Evt* script, s32 isInitialCall)
SetNpcAnimation(Evt* script, s32 isInitialCall)
SetNpcAnimationSpeed(Evt* script, s32 isInitialCall)
SetNpcCollisionChannel(Evt* script, s32 isInitialCall)
SetNpcCollisionSize(Evt* script, s32 isInitialCall)
SetNpcDecoration(Evt* script, s32 isInitialCall)
SetNpcFlagBits(Evt* script, s32 isInitialCall)
SetNpcImgFXFlags(Evt* script, s32 isInitialCall)
SetNpcImgFXParams(Evt* script, s32 isInitialCall)
SetNpcJumpscale(Evt* script, s32 isInitialCall)
SetNpcPaletteSwapLower(Evt* script, s32 isInitialCall)
SetNpcPaletteSwapMode(Evt* script, s32 isInitialCall)
SetNpcPaletteSwapping(Evt* script, s32 isInitialCall)
SetNpcPos(Evt* script, s32 isInitialCall)
SetNpcRenderMode(Evt* script, s32 isInitialCall)
SetNpcRotation(Evt* script, s32 isInitialCall)
SetNpcRotationPivot(Evt* script, s32 isInitialCall)
SetNpcScale(Evt* script, s32 isInitialCall)
SetNpcSpeed(Evt* script, s32 isInitialCall)
SetNpcSprite(Evt* script, s32 isInitialCall)
SetNpcYaw(Evt* script, s32 isInitialCall)
Item Functions
AddBadge(Evt* script, s32 isInitialCall)
AddCoin(Evt* script, s32 isInitialCall)
AddItem(Evt* script, s32 isInitialCall)
AddKeyItem(Evt* script, s32 isInitialCall)
AddStarPieces(Evt* script, s32 isInitialCall)
AddStarPoints(Evt* script, s32 isInitialCall)
ClearVariable(Evt* script, s32 isInitialCall)
CloseChoicePopup(Evt* script, s32 isInitialCall)
CountFortessKeys(Evt* script, s32 isInitialCall)
DropItemEntity(Evt* script, s32 isInitialCall)
DropResizableItemEntity(Evt* script, s32 isInitialCall)
FindItem(Evt* script, s32 isInitialCall)
FindKeyItem(Evt* script, s32 isInitialCall)
GetItemPower(Evt* script, s32 isInitialCall)
HasKeyItem(Evt* script, s32 isInitialCall)
MakeItemEntity(Evt* script, s32 isInitialCall)
RemoveBadge(Evt* script, s32 isInitialCall)
RemoveFortressKeys(Evt* script, s32 isInitialCall)
RemoveItem(Evt* script, s32 isInitialCall)
RemoveItemAt(Evt* script, s32 isInitialCall)
RemoveItemEntity(Evt* script, s32 isInitialCall)
RemoveKeyItemAt(Evt* script, s32 isInitialCall)
SetItemAlpha(Evt* script, s32 isInitialCall)
SetItemFlags(Evt* script, s32 isInitialCall)
SetItemPos(Evt* script, s32 isInitialCall)
ShowConsumableChoicePopup(Evt* script, s32 isInitialCall)
ShowGotItem(Evt* script, s32 isInitialCall)
ShowKeyChoicePopup(Evt* script, s32 isInitialCall)
Audio Functions
AdjustMusicProximityMix(Evt* script, s32 isInitialCall)
ClearAmbientSounds(Evt* script, s32 isInitialCall)
EnableMusicProximityMix(Evt* script, s32 isInitialCall)
FadeInMusic(Evt* script, s32 isInitialCall)
FadeOutMusic(Evt* script, s32 isInitialCall)
PlayAmbientSounds(Evt* script, s32 isInitialCall)
PlaySound(Evt* script, s32 isInitialCall)
PlaySoundAt(Evt* script, s32 isInitialCall)
PlaySoundAtF(Evt* script, s32 isInitialCall)
PlaySoundWithVolume(Evt* script, s32 isInitialCall)
PollMusicEvents(Evt* script, s32 isInitialCall)
PollMusicEvents(Evt* script, s32 isInitialCall
PopBattleSong(Evt* script, s32 isInitialCall)
PopSong(Evt* script, s32 isInitialCall)
PushBattleSong(Evt* script, s32 isInitialCall)
PushSong(Evt* script, s32 isInitialCall)
RegisterMusicEvents(Evt* script, s32 isInitialCall)
SetBattleSong(Evt* script, s32 isInitialCall)
SetMusicTrack(Evt* script, s32 isInitialCall)
SetMusicTrackVolumes(Evt* script, s32 isInitialCall)
StopSound(Evt* script, s32 isInitialCall)
StopTrackingSoundPos(Evt* script, s32 isInitialCall)
UseDoorSounds(Evt* script, s32 isInitialCall)
UseRoomDoorSounds(Evt* script, s32 isInitialCall)
FX Functions
DismissEffect(Evt* script, s32 isInitialCall)
DismissItemOutline(Evt* script, s32 isInitialCall)
func_802D7B74(Evt* script, s32 isInitialCall)
func_802D7690(Evt* script, s32 isInitialCall)
InterpMotionBlurParams(Evt* script, s32 isInitialCall)
PlayEffect(Evt* script, s32 isInitialCall)
RemoveEffect(Evt* script, s32 isInitialCall)
SetMotionBlurParams(Evt* script, s32 isInitialCall)
SetSleepBubbleTimeLeft(Evt* script, s32 isInitialCall)
ShowEmote(Evt* script, s32 isInitialCall)
ShowRecoveryShimmer(Evt* script, s32 isInitialCall)
ShowSleepBubble(Evt* script, s32 isInitialCall)
ShowStartRecoveryShimmer(Evt* script, s32 isInitialCall)
ShowSweat(Evt* script, s32 isInitialCall)
Virtual Entity Functions
CreateVirtualEntity_ALT(Evt* script, s32 isInitialCall)
CreateVirtualEntity(Evt* script, s32 isInitialCall)
CreateVirtualEntityAt(Evt* script, s32 isInitialCall)
DeleteVirtualEntity(Evt* script, s32 isInitialCall)
GetVirtualEntityPosition(Evt* script, s32 isInitialCall)
InitVirtualEntityList(Evt* script, s32 isInitialCall)
SetVirtualEntityFlagBits(Evt* script, s32 isInitialCall)
SetVirtualEntityFlags(Evt* script, s32 isInitialCall)
SetVirtualEntityJumpGravity(Evt* script, s32 isInitialCall)
SetVirtualEntityMoveSpeed(Evt* script, s32 isInitialCall)
SetVirtualEntityPosition(Evt* script, s32 isInitialCall)
SetVirtualEntityRenderCommands(Evt* script, s32 isInitialCall)
SetVirtualEntityRenderMode(Evt* script, s32 isInitialCall)
SetVirtualEntityRotation(Evt* script, s32 isInitialCall)
SetVirtualEntityScale(Evt* script, s32 isInitialCall)
VirtualEntityJumpTo(Evt* script, s32 isInitialCall)
VirtualEntityLandJump(Evt* script, s32 isInitialCall)
VirtualEntityMoveTo(Evt* script, s32 isInitialCall)